Keeping your dog’s ears clean is a vital aspect of ensuring excellent health in them. It helps prevent infections, reduce wax build-up, and monitor your dog’s ear health condition. Yet, one needs to have a gentle and careful approach while cleaning their dog’s ears to avoid discomfort and risk of injury in them.
In this blog, you will see highly effective tips to clean your dog’s ears safely and also to clear the wax buildup so that they maintain good ear health.
So let us get started,
1) Gather all the Supplies
To begin with, cleaning your dog’s ears, you have first to collect all the necessary supplies. These include:
Dog Ear Solution: Invest in a high-quality dog ear cleaner solution recommended by your veterinarian. Avoid using homemade or human ear cleaning solutions, as it can contain ingredients which harm your dog’s ears.
Ear Wipe: Opt for a good dog ear wipe that helps remove dirt and debris from your dog’s ears. Avoid using cotton swabs (Q-Tips) as they push the dirt further into the dog’s ear canal, putting them at risk of injury.
Towels: A clean towel for dogs can help you wipe away spills and excess ear cleaner from your dog’s ears.
Treats: Each time your dog cooperates during the ear cleaning process, you can reward them with delicious dog treats to reinforce this good behaviour.
2) Keep Them Relaxed
Choose a quiet and well-lit place for cleaning your dog’s ears. Start by gently reassuring them by offering them treats and praises for making the whole experience positive. If your dog becomes anxious, take the help of someone else to make them still and to provide them comfort.
3) Inspect Your Dog’s Ears
Before cleaning, you should inspect your dog’s ears for any signs of infection or irritation. Notice specifically for redness, swelling, discharge or a foul odour. If you see any abnormalities in your dog or any signs of discomfort, consult your veterinarian before you start cleaning their ears.
4) Apply Ear Cleaner
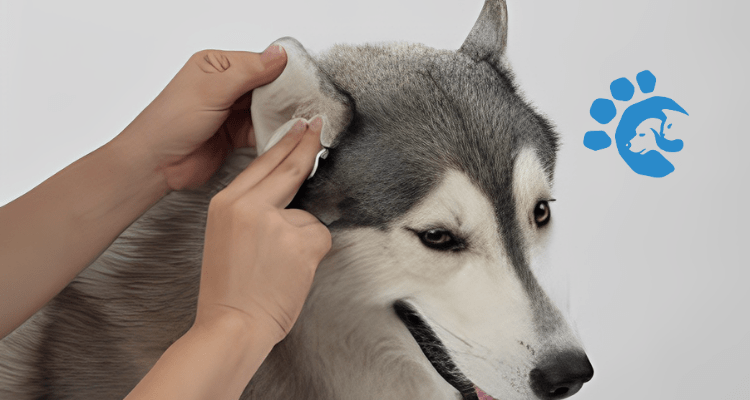
Hold your dog’s head straight and gently lift one ear flap. Now carefully squirt the recommended amount of ear cleaner solution into their ear canal. Massage the base of their ears for 20-30 seconds to make the solution go deeply into their ear canal.
5) Wipe Away The Dirt
After massaging, allow your dogs to shake their head to force out any debris from their ears. Now use an ear wipe or cotton ball to gently wipe away dirt and excess solution from their inner ear or ear flaps. Do not insert the cotton deeply into your dog’s ears to avoid causing injury to them.
6) Repeat For the Other Ear
Do the same cleaning process on your dog’s other ear using fresh cotton balls or pads. Remember that each ear should be cleaned separately to prevent cross-contamination.
7) Reward Them
Once you are done cleaning your dog’s ears, reward your dogs with treats and praises for their cooperation. This rewarding method will make your dogs stay relaxed and cooperative in their next ear-cleaning session.
8) Watch Out For Signs of Infection
After cleaning your dog’s ears, continue looking for any signs of infection or irritation. If you notice redness, swelling, discharge or any signs of discomfort such as scratching or shaking the head vigorously, consult your vet promptly.
In Brief,
Regular ear cleaning is vital for maintaining good health and comfort in dogs. By following these 8 steps, you can prevent ear infections and other ear-related complications in the dogs. Remember to always consult your veterinarian if you encounter any problem while cleaning or if you are unsure about the whole process.


