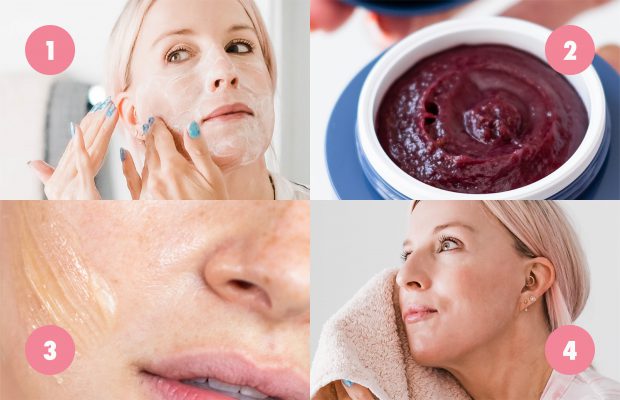
Updated 10/05/22. Giving yourself a weekly or monthly at-home facial is a great way to boost the results of your day-to-day skincare routine. Plus, it’s a welcome opportunity for relaxation and self-care (and who doesn’t need a little of that every now and then?). In this post, I’ll share a step-by-step guide, so you know the exact products and steps you’ll need. Trust me, after completing this, you’ll see clearer, smoother, and more even-toned skin!The ProductsA gentle cleanserAn at-home skin device (optional)A chemical peelA gentle facial scrubA maskAlcohol-free tonerSerumMoisturizerA soft washcloth or facial spongeThe StepsStep 1: CleanseThe first step is always to thoroughly cleanse your skin. You want to make sure any makeup, sunscreen, and oil have been completely removed from your skin. This is an incredibly important step, as it lays the foundation for the rest of the facial and makes sure the following products work most effectively.I recommend using a cleanser fit for your skin type. If you don’t know your skin type, take the Skin Type Quiz. At the end of it, you’ll get personalized product recommendations. I designed it to take the guesswork out of skincare.Step 2: Use an At-Home Skin DeviceThis step is completely optional. In other words, you can skip it, and your at-home facial will still be completely effective. However, I know people enjoy using things like LED light or microcurrent devices. On that note, read my full review of at-home skin devices to learn which ones are worth it, and just as importantly, which ones aren’t.Step 3: Use an At-Home Chemical PeelNext, it’s time for a thorough exfoliation. Start with a well-formulated, at-home chemical peel, like the Triple Berry Smoothing Peel. I formulated this with a combination of six exfoliating acids (glycolic, lactic, malic, mandelic, phytic, and tartaric), as well as gluconolactone (a polyhydroxy acid), and antioxidant-rich fruit extracts. Translation? It can dramatically smooth and brighten the skin without causing excess irritation.Apply a thin layer and leave it on for 3-5 minutes. It will get right to work dissolving cellular build-up.Step 4: Use a Gentle Facial ScrubI’m a big fan of a two-step exfoliation method. While a chemical peel will dissolve the bonds that hold expired skin cells together, it’s the polishing action from a facial scrub that will actually lift them up and off the skin.Just make sure you’re using a well-formulated facial scrub, as some contain abrasive particles that can do more harm than good (that’s part of the reason why they’ve gotten such a bad rap recently. Even though they might be considered “unpopular,” I truly believe in the benefits of a facial scrub!). I like the Triple Berry Smoothing Scrub. It contains perfectly round and biodegradable jojoba beads that roll across the surface of the skin to remove expired cells.Massage the scrub over your skin for 30-60 seconds with light, even pressure. Then, rinse it off your skin and pat dry.Step 5: Apply a Face MaskImmediately follow up with a face mask of your choice. I suggest using one that contains hydrating and soothing ingredients to comfort the fresh skin cells you just revealed with the previous exfoliating steps. I recommend the Rapid Response Detox Masque. Not only does it contain the hydrating, soothing ingredients I was talking about, but it also contains breakout-fighting ingredients to help prevent clogged pores and blemishes.Leave it on for 15 minutes. Then, rinse it off. You can gently wipe your skin with a soft washcloth (I use baby washcloths because they’re so gentle) or a facial sponge.Step 6: Use an Alcohol-Free TonerOnce the mask has been rinsed off, I like to give my skin yet another boost of hydration. I do this by using an alcohol-free toner. I saturate a Toning Cloth with it, and then run it over my face and neck to infuse my skin with deep hydration. This also helps removes any impurities that could be left over on your skin from tap water.Step 7: Apply SerumAfter a facial, your skin is perfectly primed for the active ingredients in a serum. Use one that’s formulated for your specific skin type and that contains more soothing, hydrating ingredients. Since you already used two methods of exfoliation, you definitely want to stay away from any exfoliating acid serums. Opt for something like the Firm + Repair Overnight Serum, which contains peptides, algae extract, and antioxidants.Step 8: Apply MoisturizerThe final step in an at-home facial is to seal everything in with moisturizer. As always, make sure you’re using one that’s formulated for your skin type. Personally, I’ll also dab on eye cream during this step, just to make sure every part of my skin is soothed, comforted, and moisturized.There you have it! This at-home facial will leave your skin brighter, clearer, and feeling silky smooth. While doing this monthly is great, you’ll get even better results from doing it weekly.Next, you can minimize the appearance of your pores—here’s how!Celebrity Esthetician & Skincare ExpertAs an esthetician trained in cosmetic chemistry, Renée Rouleau has spent 30 years researching skin, educating her audience, and building an award-winning line of products. Her hands-on experience as an esthetician and trusted skin care expert has created a real-world solution — products that are formulated for nine different types of skin so your face will get exactly what it needs to look and feel its best. Trusted by celebrities, editors, bloggers, and skincare obsessives around the globe, her vast real-world knowledge and constant research are why Marie Claire calls her “the most passionate skin practitioner we know.”


